

Build a Raycast extension
(Windows edition)
Extensions allow you to add extra features to Raycast. Let’s build your first Raycast extension to check the weather!
Setup
Raycast on Windows is still in private beta, but we have exclusive invite codes for Hack Clubbers. Once you’ve gotten your idea, you’ll need to request a code here:
Before you can start building extensions, you need to have the following installed:
- Raycast 0.27.1.0 or higher (get an invite with the button above)
- Node.js 22.14 or higher. (nvm is a helpful tool to switch between versions)
- npm 7 or higher (should come installed with Node.js)
And set up time tracking with Hackatime in your favorite editor!
Extension setup
Developer support on Windows isn’t fully complete, but it already works pretty well!
First off, create a repository with the template:
https://github.com/samdev-7/raycast-hello-world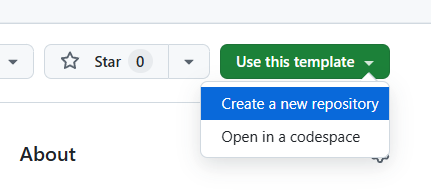
In your favorite editor, edit the package.json file to your liking. I’m making a weather extension, so I’ll update mine accordingly.
You’ll want edit the name, title, description, and commands. Here’s what I ended with:
{
  "$schema": "https://www.raycast.com/schemas/extension.json",
  "name": "weather",
  "title": "Weather",
  "description": "Get information about the weather",
  "icon": "extension-icon.png",
  "author": "samliu",
  "license": "MIT",
  "commands": [
    {
      "name": "weather",
      "title": "weather",
      "description": "Get the current weather conditions in Berlin",
      "mode": "view"
    }
  ],
  "dependencies": {
    "@raycast/api": "^1.101.1",
    "@raycast/utils": "^1.17.0"
  },
  "devDependencies": {
    "@raycast/eslint-config": "^2.0.4",
    "@types/node": "22.13.10",
    "@types/react": "19.0.10",
    "eslint": "^9.22.0",
    "prettier": "^3.5.3",
    "typescript": "^5.8.2"
  },
  "scripts": {
    "build": "ray build",
    "dev": "ray develop",
    "fix-lint": "ray lint --fix",
    "lint": "ray lint",
    "prepublishOnly": "echo \"\\n\\nIt seems like you are trying to publish the Raycast extension to npm.\\n\\nIf you did intend to publish it to npm, remove the \\`prepublishOnly\\` script and rerun \\`npm publish\\` again.\\nIf you wanted to publish it to the Raycast Store instead, use \\`npm run publish\\` instead.\\n\\n\" && exit 1",
    "publish": "npx @raycast/api@latest publish"
  }
}
Since we edited the extension name, we need to update our command file in src/, rename it to weather.tsx.
Here’s what’s currently our file:
import { Detail } from "@raycast/api";

export default function Command() {
  return <Detail markdown="# Hello World" />;
}
If you’ve used React before, this might look familiar, because it is React. Essentially, Raycast extensions use pre-made React components. You can still make a Raycast extension if you’ve never used React, though!
We still need to run a few terminal commands before we can run our extension.
First, in the terminal install the required packages
npm installAnd actually run it
npm run devYour extension will automatically reload and update as you change your code!
You can actually stop this script with control + c, and the extension will still be available on Raycast.
Let’s go back to Raycast, if you search up run your command, it should appear and say “Hello World”!

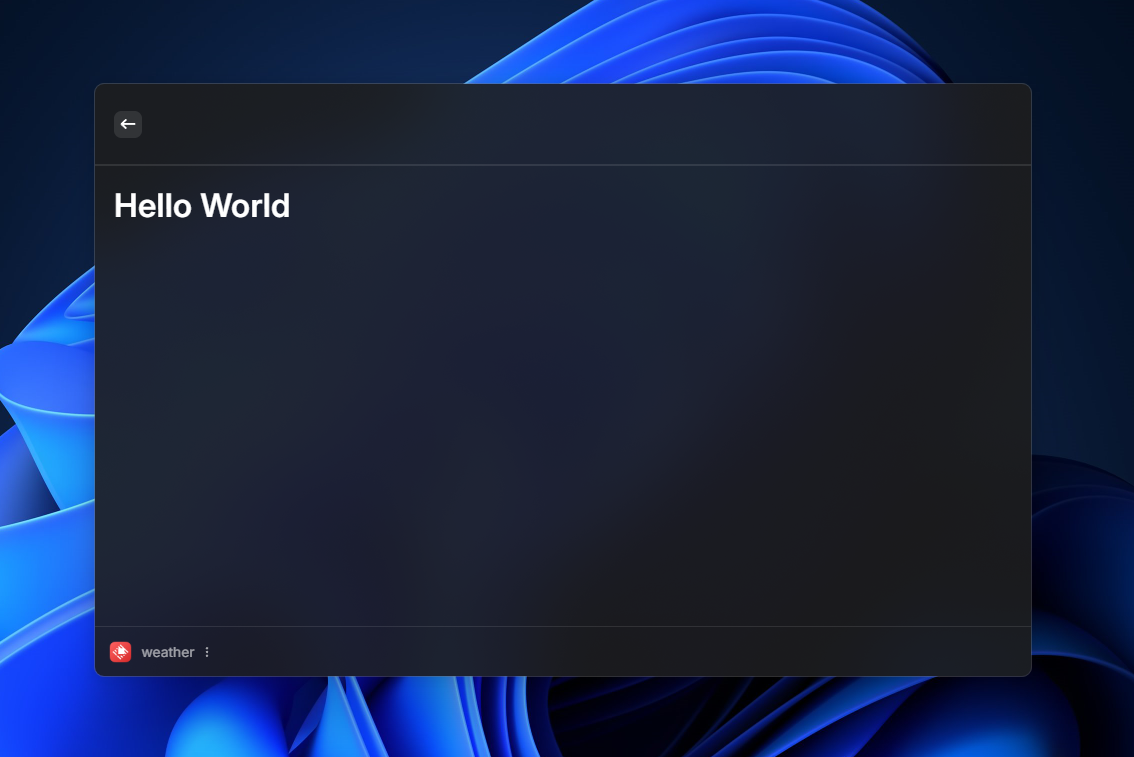 The green drive icon means that
 npm run dev is active.
Write the code
If you’ve used React before, you can probably skip this step.
Here’s some basic code to fetch the weather in Berlin.
import { Detail } from "@raycast/api";
import { useEffect, useState } from "react";
type WeatherData = {
temperature: string;
wind: string;
description: string;
};
export default function Command() {
const [weather, setWeather] = useState<WeatherData | null>(null);
const [error, setError] = useState<string | null>(null);
useEffect(() => {
fetch("https://goweather.xyz/weather/berlin")
.then((res) => {
if (!res.ok) throw new Error("Network response was not ok");
return res.json();
})
.then((data) => {
const weatherData = data as { temperature: string; wind: string; description: string };
setWeather({
temperature: weatherData.temperature,
wind: weatherData.wind,
description: weatherData.description,
});
})
.catch((e) => setError(e.message));
}, []);
if (error) {
return <Detail markdown={`# Error\n${error}`} />;
}
if (!weather) {
return <Detail markdown="Loading weather..." />;
}
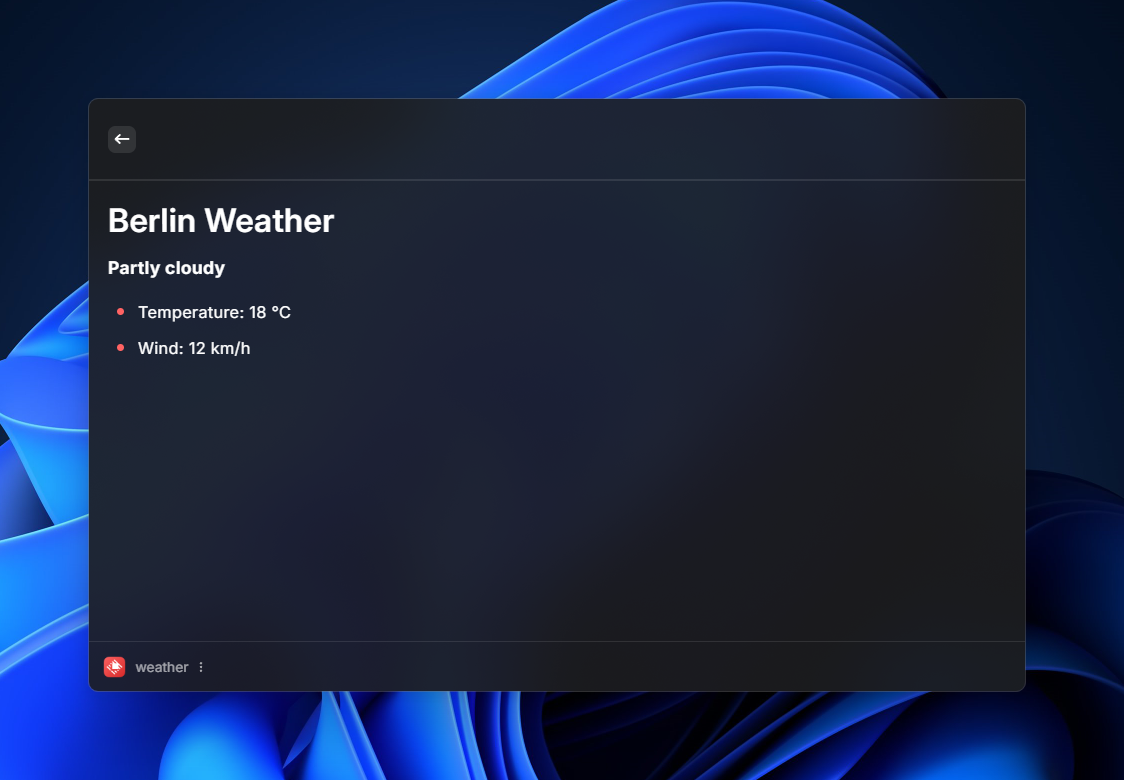
return (
<Detail
markdown={`# Berlin Weather\n\n**${weather.description}**\n\n- Temperature: ${weather.temperature}\n- Wind: ${weather.wind}`}
/>
);
}We’re using Typescript, so we first define what type of data we expect from goweather.xyz.
useState allows us to save values that allow other elements to respond to it’s changes. Notice how we put {weather.description} or if (weather) but never explicitly write code to update it after we get the weather data? React handles that for us because weather is a state.
useEffect is used to run code as a result of another action. In our case, we want our code to run when our command is loaded. Notice at the end, we put }, []);. The empty array tells React to run it on load.
The rest is pretty standard JavaScript, we’re just using fetch to get data from an API.
Finally, we use Raycast’s <Detail> component to show stuff to the screen.
Check out the Raycast examples and documentation
Raycast has a few awesome examples of how to implement things, you should check them out here: https://developers.raycast.com/examples/hacker-news
Do note that Windows support is not fully complete. Some of the stuff with the system might not work, but most UI elements should still function.
There are so many other possibilities. Raycast provides a ton of UI elements, and because it’s React, you can write your own!
(Optional) Publish your extension to the store!
First, if you want your extension to support macOS, grab a macOS friend/laptop and test it on there.
Then, this to your package.json
"platforms": [
  "macOS",
  "Windows"
]
If your extension only works on Windows, you won’t be able to publish it to the store, but other people can still install your extension manually with npm install && npm run dev.
Raycast makes it super easy to publish, run the following command and follow the instructions:
npm run publishOnce you’re done, submit your extension!
Built with ♥︎ by Hack Club. cmd + k is not affiliated or endorsed by Raycast